Smooth Weights for Blender
1. Introduction
1.1 Overview
Smooth Weights extends Blender’s weight painting with an interactive brush that averages vertex group weights across a mesh, along with a range of options to shape the smoothing to production requirements. It is aimed at character skinning, where large amounts of manual weight painting are normally required to achieve clean, deformation-ready weights.
Rather than replacing Blender’s native tools, Smooth Weights works alongside them. The brush can be used directly in Object or Weight Paint Mode, all settings can be adjusted while the tool is running, and almost every property is bound to a customisable keymap so that the workflow can be tuned to individual preferences.
The add-on also includes a Symmetry Map, a secondary tool that processes a mesh for symmetry once and then reuses the result for any mirror-related operation. This makes weight mirroring fast and reliable, even on meshes that consist of multiple islands or that are only partially symmetrical.
Videos:
Smooth Weights - Add-on for Blender
Smooth Weights - How to use the Symmetry Map
1.2 Key Features
- Interactive, painting-style weight smoothing brush
- Surface and volume-based smoothing
- Built-in selection painting without entering Edit Mode
- Group limiting and vertex group type filtering
- Locked vertex group support
- Symmetry mapping for fast and reliable weight mirroring
- Flood smoothing for whole meshes or selections
- Fully customisable keymaps and pie menu
- Optimised for large production meshes
2. Installation and Setup
Smooth Weights is implemented as an Extension for Blender 4.2 and later, which replaces the traditional add-on system for some functionality.
2.1 Installing the Extension (Blender 4.2 and later)
- Download smoothWeights.zip.
- Drag-and-drop the archive into the Blender window.
- Choose a User Repository from the drop-down menu.
- Confirm the installation.
The extension registers itself automatically and is available immediately after installation.
3. Tool Access
Smooth Weights can be found in several locations:
3D View Side Panel
The
Tool
tab contains a folder with the name
Smooth Weights. The location of the tool can be customised from the add-on preferences; an alternative placement is a dedicated
Smooth Weights
tab in the 3D View Side Panel.
Object Menu
The add-on adds menu items to
3D View (Object Mode) > Object > Smooth Weights.
Weights Menu
The add-on adds menu items to
3D View (Weight Paint Mode) > Weights > Smooth Weights.
The object must be in Object or Weight Paint Mode for the tool to appear.
Symmetry Map is found in the Mesh Properties panel.
3.1 Requirements
The mesh must have at least two vertex groups for the panel and menu items to appear. There is no reason to smooth weights when only a single vertex group is present.
4. Quick Start
4.1 Paint
- Select the mesh in Object or Weight Paint Mode. There is no need to explicitly enter Weight Paint Mode.
- From the side panel in the 3D View choose the Tool tab.
- Open the folder Smooth Weights.
- Press Brush.
- All settings can be adjusted from the side panel before entering the tool or via keymaps while the tool is active. The current settings are displayed in an in-view info in the lower-left corner of the 3D View.
- LMB paint over the mesh to smooth the weights.
- Press Enter to finish the tool or Esc / RMB to cancel.
- To undo the last stroke while the tool is active, use the default undo key, without any modifiers.
4.2 Flood
- Select the mesh in Object or Weight Paint Mode. There is no need to explicitly enter Weight Paint Mode.
- From the side panel in the 3D View choose the Tool tab.
- Open the folder Smooth Weights.
- Adjust the settings for flooding from the side panel.
- Press Flood.
- Adjust the flood properties from the redo panel.
5. Smoothing Modes
5.1 Surface Smoothing
By default, Surface smoothing is active. This averages the weights of a vertex with the weights of its connected neighbouring vertices. It is the fast, predictable mode and the recommended default for most skinning work.
5.2 Volume Smoothing
In Volume mode the smoothing is performed based on the proximity of other vertices. These do not have to be connected; only the distance is taken into account. This can help smooth the weights across several discontinuous islands, such as overlapping geometry.
Volume smoothing should be handled with care, as it can easily introduce weights in areas that should not be affected.
Volume smoothing can be very performance intensive, as it requires much more computation than Surface smoothing. For every vertex inside the brush radius, the mesh is searched for vertices that fall within the range defined by Volume Range. Keeping the Volume Range as small as possible helps to keep the tool responsive.
5.3 Use Islands
By default, weights are smoothed across shell boundaries to maintain the integrity of the mesh when deformed. This means that the opposite vertex of a border point receives the same weight as its border sibling, which greatly helps to keep mesh seams together during animation.
5.4 Selection
Smooth Weights has a built-in, painting-style selection mode. This allows selections to be created directly in pose, without switching to Edit Mode. The selection colours are applied through vertex colours and do not show in special modes, such as Weight Paint Mode. The selection is used together with the Use Selection and Affect Selected properties to constrain the smoothing to a certain area or to protect vertices from being smoothed. Use Toggle Select Mode (W) and Toggle Deselect Mode (E) to switch between smoothing and defining the selected area.
6. Properties
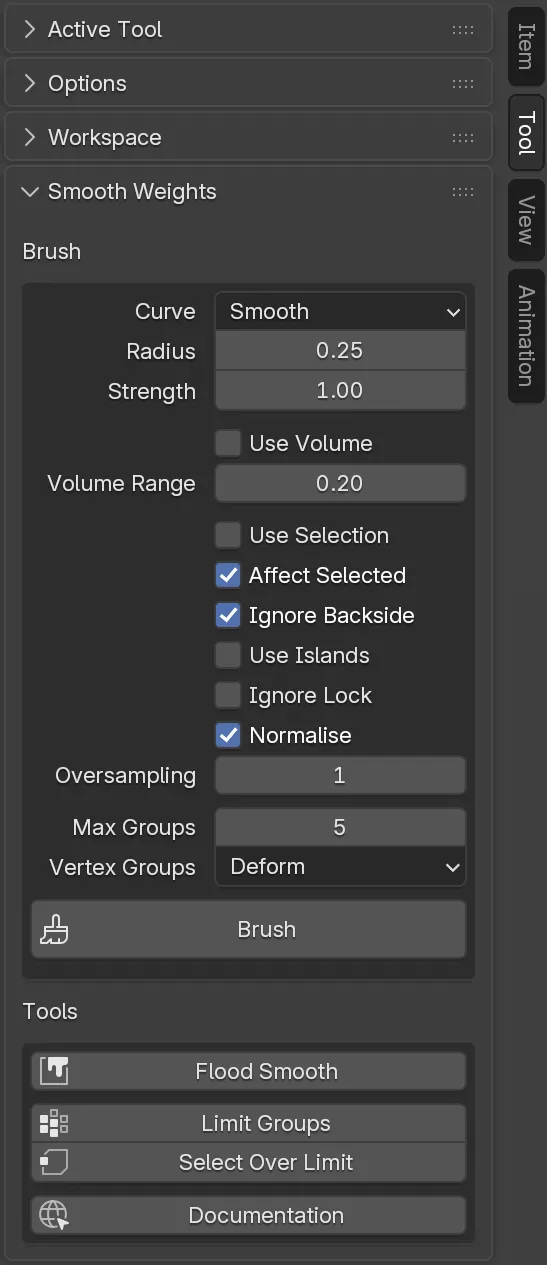
All smooth-related settings can be adjusted while the tool is active.
6.1 Radius
The brush radius in generic Blender units.
6.2 Strength
The strength of the smoothing effect. A value of 1 defines a full averaging with neighbouring weights.
6.3 Curve
The brush falloff curve. The further a vertex is from the brush centre, the less the smoothing effect. Vertices close to the brush centre are affected most.
6.4 Use Selection
If enabled, Affect Selected is evaluated to smooth either selected or unselected vertices. If disabled, all vertices are affected, regardless of their selection state.
6.5 Affect Selected
Smooths only the selected vertices. When off, only unselected vertices are affected.
6.6 Ignore Backside
If enabled, all faces viewed from the back are ignored for painting.
6.7 Ignore Lock
Smooths the weights of vertex groups even if these are locked.
6.8 Use Islands
Extends the smoothing across an island boundary by trying to find an equivalent vertex on a neighbouring island boundary. This helps maintain mesh continuity during deformation.
6.9 Normalise
Normalises the averaged weights to a sum of 1.
6.10 Oversampling
The number of iterations for the smoothing. If set to 1, only one smoothing pass is performed. The strength of each pass is divided by the oversampling value to avoid oversmoothing.
Oversampling acts the same as applying the smoothing several times in sequence and can slow down performance.
6.11 Use Volume
Enables the Volume mode, where weights are smoothed based on vertex distance. Because it is volume based, the weights can also spread across islands and nearby surfaces. When off, the weights are smoothed based on the connected neighbours in Surface mode.
6.12 Volume Range
The fraction of the brush size within which neighbouring vertices are considered for smoothing for each vertex in Volume mode. This is equivalent to connected vertices in Surface mode. The range factor acts as a multiplier for the Radius value.
For performance it is important to keep this value as small as possible but large enough to capture nearby vertices.
6.13 Max Groups
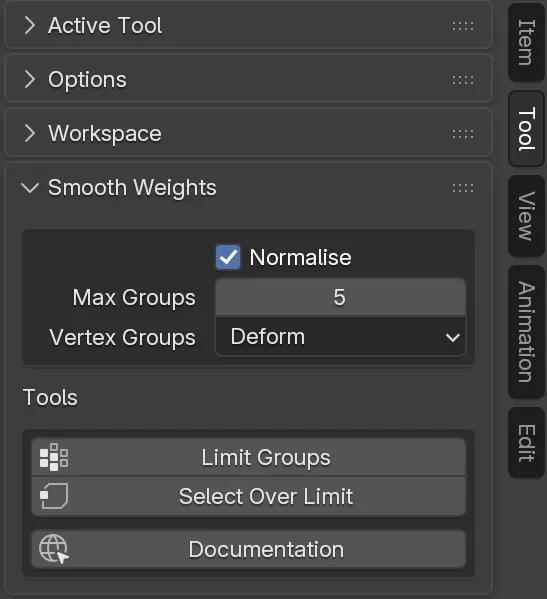
The maximum number of vertex groups a vertex can be assigned to. If set to 0, limiting of the maximum number of vertex groups is disabled.
6.14 Vertex Groups
Defines which type of vertex group is affected by the smoothing.
- All : Smooth all vertices regardless of the vertex group type, deforming or non-deforming.
- Deform : Only vertex groups that belong to deforming bones are affected by the smoothing.
- Other : Only vertex groups that do not belong to deforming bones are affected by the smoothing.
6.15 Blend Border
Blends open vertex group borders with the surrounding vertices that are not affected by any vertex group. This property is available with Vertex Group type Other. When off, the border of a vertex group is not directly affected.
6.16 Use Symmetry
Enables symmetrical smoothing if a symmetry exists and is defined for the affected vertices. Active symmetry does not also mirror the brush circle. Symmetry requires a Symmetry Map to be set up in advance, as described in Symmetry Map .
7. Keymaps
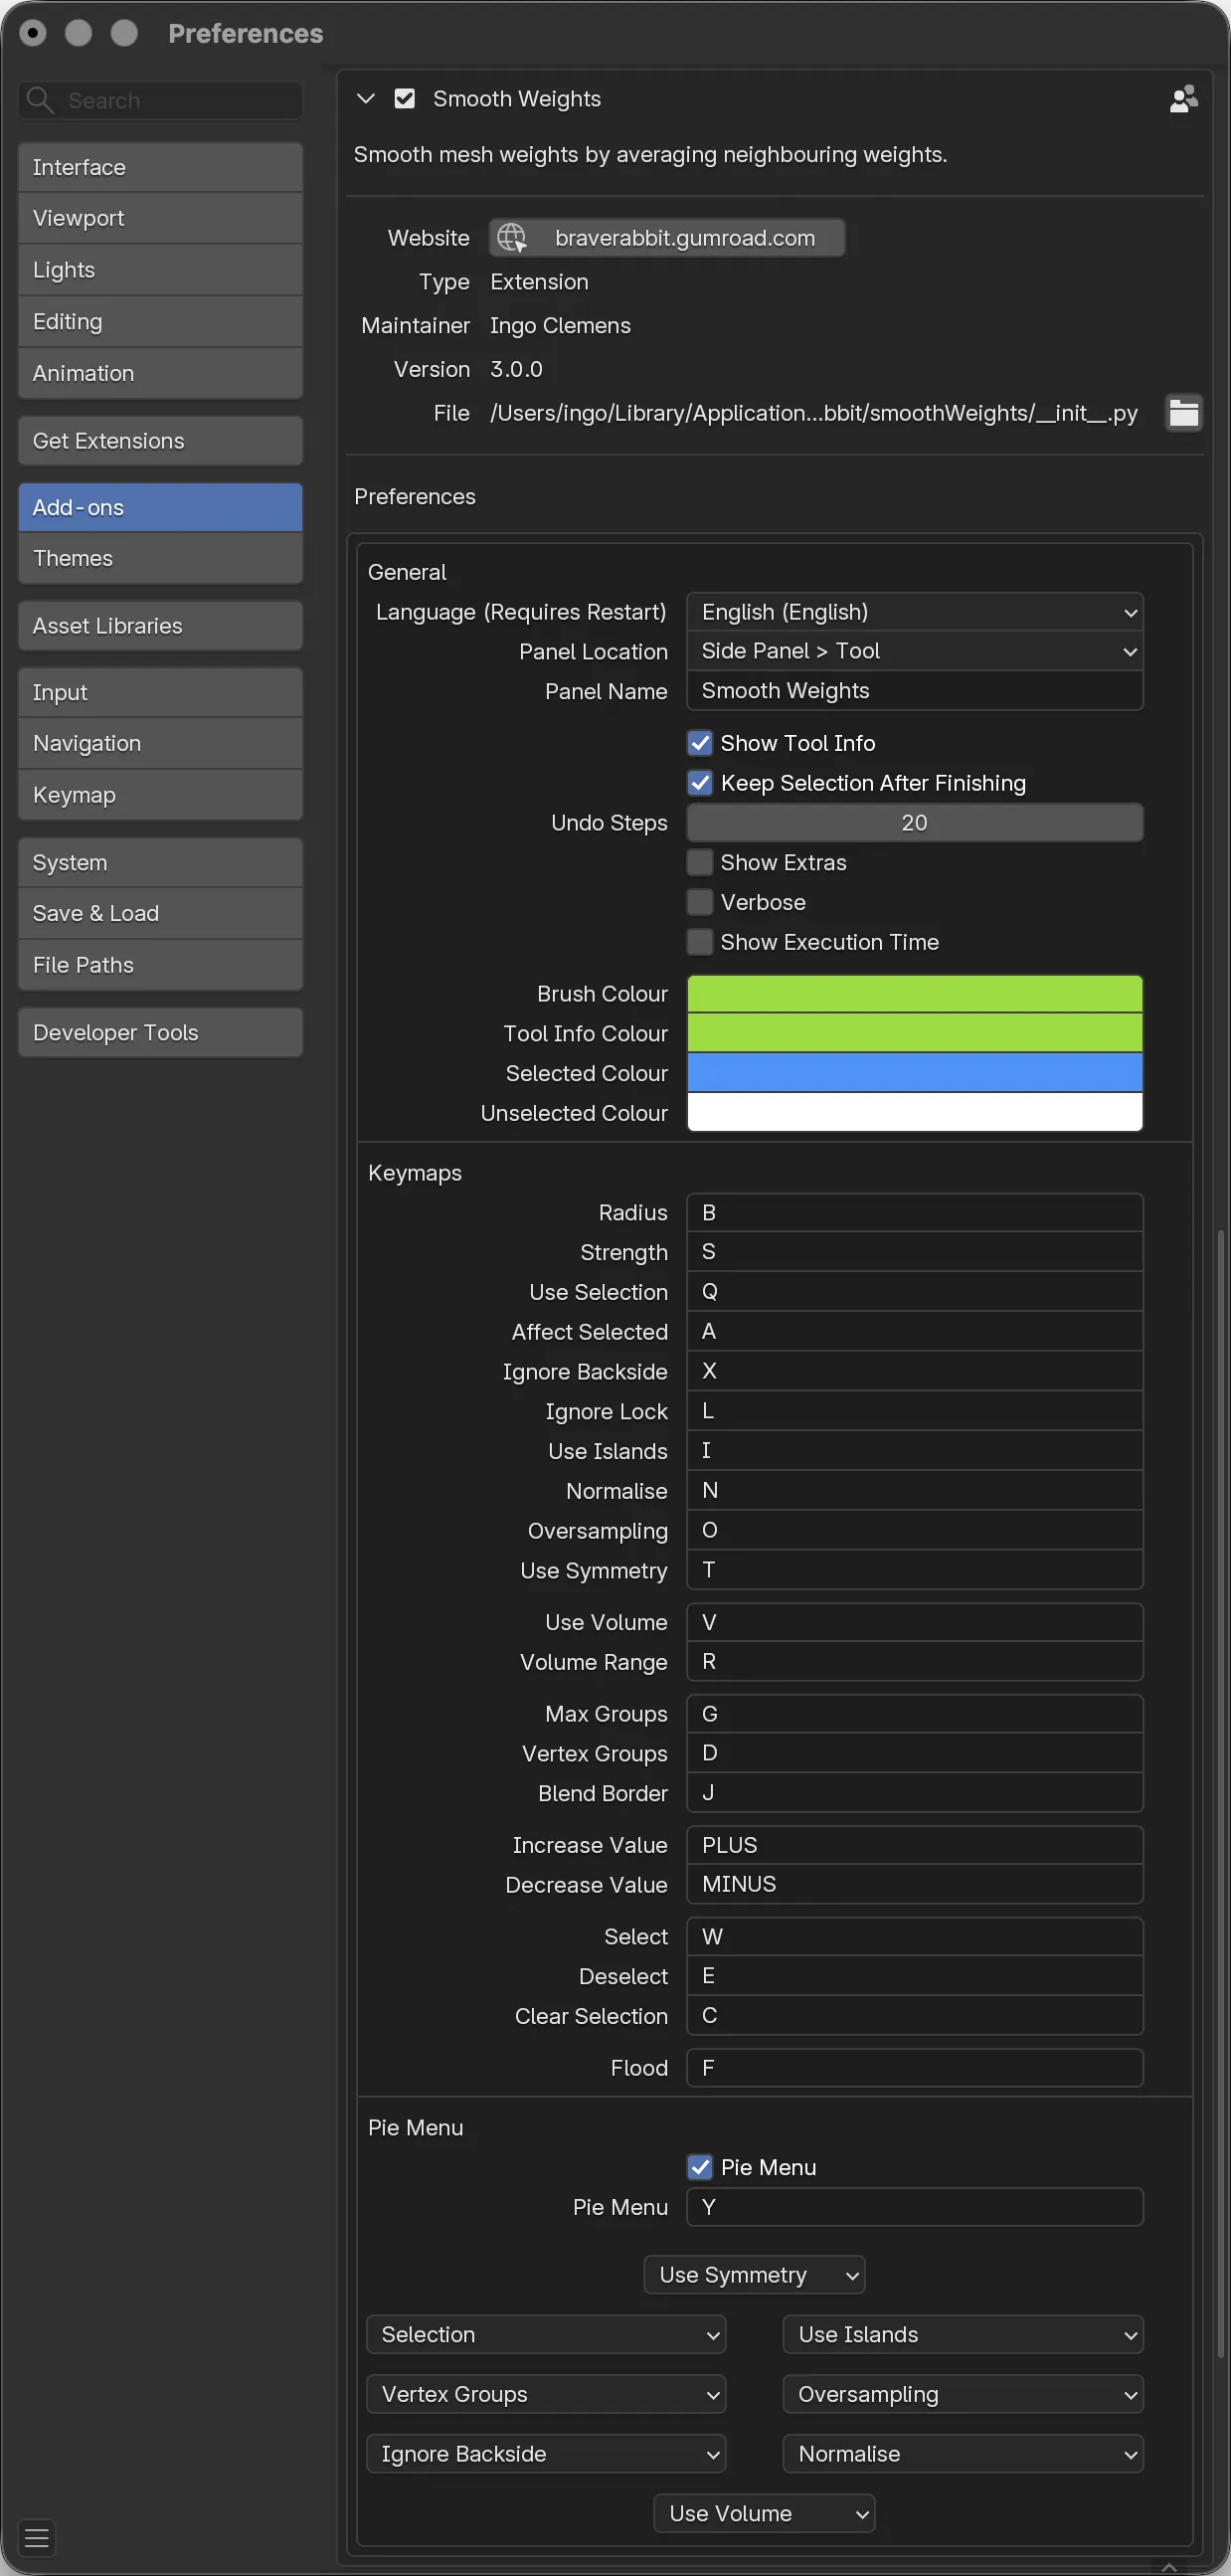
The default keymaps are:
B: Brush size
Hold B while dragging the cursor left/right to adjust the size. Hold Shift for faster adjustment and Ctrl for slower. Make sure to hover over the mesh.
S: Brush strength
Hold S while dragging the cursor left/right to adjust the strength. Hold Shift for faster adjustment and Ctrl for slower. Make sure to hover over the mesh.
1/2/3/4: Brush Curve Falloff
The numbers correspond, in order, to: None, Linear, Smooth, Narrow.
Q: Use Selection
W: Toggle Select Mode
E: Toggle Deselect Mode
C: Clear Selection
A: Affect Selected
X: Ignore Backside
L: Ignore Lock
I: Use Islands
N: Normalise
O: Oversampling
Hold O while pressing + or - to increase or decrease the oversampling value.
V: Volume (off for surface smoothing)
R: Volume Range
Hold R while dragging the cursor left/right to adjust the range. Hold Shift for faster adjustment and Ctrl for slower. Make sure to hover over the mesh.
G: Groups
Hold G while pressing + or - to increase or decrease the number of vertex groups. Zero ignores any group limit.
D: Vertex Group (Type)
Hold D while pressing + or - to define which vertex group type is affected: Deformation, Non-Deformation or All.
J: Blend Border
T: Use Symmetry
F: Flood
Shift + RMB: Frame Change
Change the current frame by dragging the mouse left or right.
Y: Pie menu
All keymaps, except the frame change, are customisable from the add-on preferences.
8. Tools
8.1 Limit Groups
Limits the number of vertex group influences per vertex to a maximum defined by Max Groups. Any influences beyond the limit are removed, keeping only the vertex group assignments with the strongest weights. The remaining weights can optionally be normalised.
If the mesh is in Object Mode, all vertices are processed. In Edit Mode, only the selected vertices are evaluated. If there is no active vertex selection, all vertices are taken into account.
The tool also respects the Vertex Groups setting, to further narrow down which type of vertex groups are affected.
8.2 Select Over Limit
Selects all vertices whose number of vertex group influences exceeds the maximum defined by Max Groups. This is useful for identifying the vertices that would be affected by the Limit Groups operation before making changes.
If the mesh is in Object Mode, all vertices are processed. In Edit Mode, only the selected vertices are evaluated. If there is no active vertex selection, all vertices are taken into account.
The tool also respects the Vertex Groups setting, to further narrow down which type of vertex groups are affected.
9. Symmetry Map
When working with character rigs and skin weights, mirroring is essential for accelerating various processes and improving the overall workflow. Being able to skin one side of a mesh and reliably mirror the weights to the other side removes a large amount of repetitive work.
However, while mirroring is straightforward for simple, perfectly symmetrical meshes, it can easily fail if the mesh is not completely symmetrical to begin with. Even with topological symmetry, there is no guarantee that mirroring will function reliably in all cases. Additionally, if a mesh consists of multiple mesh islands, most mirroring methods fail, as they generally expect only a single island.
Smooth Weights employs a built-in Symmetry Map, which supports both position-based and topological symmetry. It is capable of handling a wide range of symmetrical meshes, including those with multiple islands. The mapping is performed once and then reused for various symmetry operations. The advantage is a gain in both accuracy, because once a vertex has been mapped it will never fail, and speed, because symmetrical points do not need to be found for every operation over and over.
The Symmetry Map is used by the Smooth Weights brush, through the Use Symmetry property, and by the Mirror Weights, Symmetrise Mesh and Flip Mesh operators in the Symmetry Map panel.
The panel is found in the Mesh Properties panel and is divided into two sections: Mapping and Mirroring.
9.1 Status
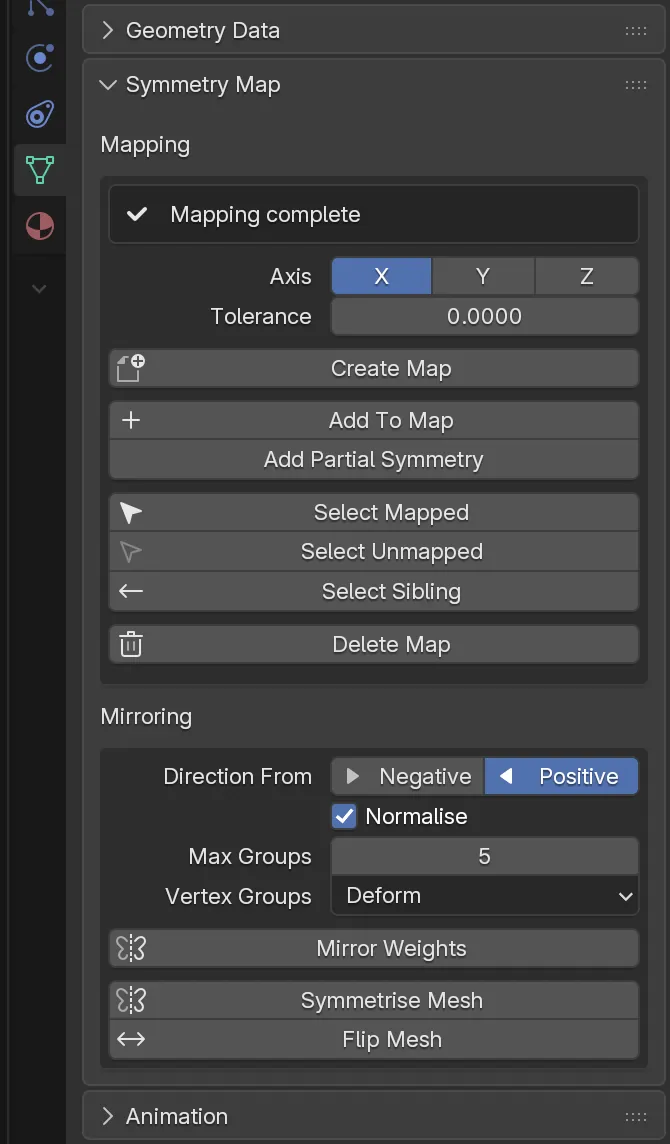
The Symmetry Map status is shown at the top of the Mapping section. The indicator represents one of the following states:
- Inactive / Undefined : No symmetry data is present, or the map contains no mapped vertices.
- Partial : Only a portion of the mesh has been mapped. The status shows how many vertices are mapped relative to the total vertex count.
- Mismatch : The number of vertices in the mesh differs from the stored map data. This usually indicates that the topology changed after the map was created, and the map should be recreated.
- Active : The mesh is completely mapped and the Symmetry Map is ready to be used for mirroring.
9.2 Preferences
The mapping process relies on two properties, shown at the top of the Mapping section.
- Axis : Defines the axis of symmetry. By default, this is set to the X-axis.
- Tolerance : The tolerance used to find symmetrical points. Lower values enforce stricter accuracy, while higher values may lead to false assignments. For Topological Symmetry, this is used to locate a base centre edge. For Partial Symmetry, it is used to find matching point positions. If set to 0 (the default), an automatic internal value is calculated based on edge length. For Topological Symmetry, it is generally best to leave this value at 0, while for Partial Symmetry a small tolerance is recommended. When adding Partial Symmetry, selecting two vertices can be used to automatically determine the tolerance if the property remains set to 0.
These properties are not global add-on preferences but are owned by the active mesh object.
Two related add-on preferences influence the Symmetry Map workflow:
- Verbose : Writes the mapping process results to the command output. This is only used for debugging purposes.
- Extras : Enables the Walk Siblings operators in the Mapping section while in Edit Mode (see Walk Siblings ).
9.3 Migrating an Older Symmetry Map
Earlier versions of Smooth Weights stored the Symmetry Map with a separate entry for every vertex. Blender copies this data every time the mesh is evaluated, which slows down the playback of any scene containing such a mesh, whether the map is used or not. The current version stores the map as a single compact array, which has no noticeable effect on playback.
Maps of all earlier versions are converted automatically, without any interaction. This happens for all meshes when a file is opened and for meshes which are appended to the scene later. The old data is removed in the process.
The conversion is one-way. Older versions of Smooth Weights opening the same file will no longer find a Symmetry Map. Maps of linked meshes are converted when their library file is opened with the current version.
9.4 Mapping
This section contains the operators for creating, editing and deleting the Symmetry Map.
9.4.1 Create Map
Starts the automatic mapping process and evaluates the mesh. All verified islands are mapped and stored in the Symmetry Map on the mesh.
- In Object Mode, all islands are mapped automatically.
- In Edit Mode with a single edge selected, the selected edge is used as the user-defined centre edge to map the related island. Only a single edge selection is supported.
- In Edit Mode with a face selection, only the selected region is mapped. This is useful for meshes with mixed topology: select the faces that have topological symmetry and run Create Map. If a map already exists, the operator label changes to Extend Map and the selected region is added to the existing map.
9.4.2 Add To Map
Adds islands to the Symmetry Map that failed during the automatic mapping process. There are three types of mesh islands that can be mapped in this way:
-
Spanning Island :
The island has topological symmetry, but the centre edge is too far from the mesh centre. Select the edge to be used as the centre edge and execute Add To Map. -
Spanning Island - no centre :
The island may have topological symmetry but lacks a centre edge loop. In this case, select two matching edges on either side of the mesh before running the operator. -
Island Pair :
Two islands that are symmetrical to each other on opposite sides of the mesh. Select two matching edges, one from each island, then run the operator.
9.4.3 Add Partial Symmetry
Partial symmetrical meshes generally lack full topological symmetry, meaning they differ on each side of the mesh. Processing and mapping these islands is only possible by matching point positions, and such meshes often cannot be completely mapped. The mapping process attempts to find symmetrical vertices based on their position and the specified tolerance. A lower tolerance might miss valid pairs, while a higher tolerance could identify too many, resulting in failed mapping. A practical approach is to test various tolerance values and compare the outcomes.
Partial mapping is also additive: once vertices have been mapped, they are ignored in subsequent passes. This allows multiple consecutive operations with different settings to progressively build the Symmetry Map.
To further assist partial mapping, it is possible to guide the process with a semi-automatic tolerance. This is done by selecting two matching vertices from both sides of the mesh, ideally from a side view. Their relative offset is used to determine the tolerance for the next operation only. This makes it possible to extend the map by incrementally mapping vertices with increasing tolerance values.
9.4.4 Select Mapped
Switches the mesh to Edit Mode and selects all vertices that have been successfully mapped.
9.4.5 Select Unmapped
Switches the mesh to Edit Mode and selects all vertices that have no corresponding sibling on the opposite side of the mesh.
9.4.6 Select Sibling
Expands the current vertex selection by also selecting the related sibling vertices on the other side of the mesh.
9.4.7 Walk Siblings
When the Extras add-on preference is enabled and the mesh is in Edit Mode, the Mapping section provides an additional set of controls for stepping through sibling pairs one at a time. This is helpful when verifying a map or inspecting individual mappings.
- Previous / Next : Selects the previous or next sibling pair.
- Clear : Resets the internal walk index so that stepping starts again from the beginning.
9.4.8 Delete Map
Removes the Symmetry Map from the mesh.
9.5 Mirroring
This section contains the tools that take advantage of an existing Symmetry Map. It is only shown when the map is valid and complete enough to be used.
9.5.1 Direction From
Defines the direction in which the mirroring is applied. The axis of the mirroring is set in the Mapping section of the panel.
- Positive : The weights from the positive side of the mesh are copied to the negative side.
- Negative : The weights from the negative side of the mesh are copied to the positive side.
The Mirroring section also exposes Normalise, Max Groups and Vertex Groups, which behave as described under Properties and control how the mirrored weights are processed.
9.5.2 Mirror Weights
Copies all vertex weights and vertex group assignments from one side of the mesh to the other. If the mesh is in Object Mode, all weights are copied. In Edit Mode, only the current selection is used. All side-related vertex group names are swapped, and various naming conventions are supported (left/right, lt/rt, lft/rgt, lf/rg, l/r; all in upper- and lower-case).
9.5.3 Symmetrise Mesh
Makes the mesh geometry symmetrical by copying the vertex positions from one side to the other, based on the Symmetry Map and the selected Direction From. This is useful for cleaning up a mesh that has become slightly asymmetrical while keeping the existing topology intact.
9.5.4 Flip Mesh
Mirrors the mesh across the symmetry axis by swapping the positions of each vertex with its sibling. Unlike Symmetrise Mesh, which copies one side onto the other, Flip Mesh exchanges the two sides.
9.6 Compatibility with SHAPES
The Symmetry Map is shared in concept with the SHAPES add-on, which uses the same mapping technology. A typical workflow is to rig and skin a character with Smooth Weights first, creating a Symmetry Map in the process, and to move to SHAPES later for shape key work.
When SHAPES is first used on a mesh that already carries a Smooth Weights Symmetry Map, it automatically imports the map and creates its own from it. From that point on, SHAPES owns the map.
The transfer is one-way and happens once. Smooth Weights does not read SHAPES maps, and SHAPES does not continue to synchronise with the Smooth Weights map after the initial import.
9.7 Python Access
The Symmetry Map is stored on the mesh datablock and can be read from Python:
import bpy
mesh = bpy.context.active_object.data
index = 5
sibling_index = mesh.symmetry_map.indexMap[index].index
print(f”The sibling of vertex {index} is vertex {sibling_index}”)
The map is stored as a per-vertex collection. The position of an item indicates the vertex index on one side, and its
index
value is the sibling vertex on the other side. Unmapped vertices are marked with
-1.
10. Performance
Weight smoothing has been extensively optimised for large meshes. The following timings were measured on a production character mesh with 90.5k vertices and 83 vertex groups, at default settings:
| Operation | v2.8 | v3.0 | Speedup |
|---|---|---|---|
| Flood smooth, surface mode | 3.5 s | 0.7 s | ~5× |
| Flood smooth, volume mode | 31.6 s | 3.5 s | ~9× |
| Flood smooth, volume mode, oversampling 4 | 174.9 s | 6.6 s | ~27× |
| Brush stroke update | 40–60 ms | ~8 ms | ~6× |
Volume mode benefits the most: with the default volume range, the test mesh averages over 400 neighbours per vertex, around 39 million neighbour links in total, which are now processed more efficiently than before. And oversampling passes have become comparatively cheap through improved neighbour search for every pass.
11. Known Issues
Standard Brush Display
When smoothing the mesh in Blender’s
Weight Paint
Mode, the standard brush is displayed along with the
Smooth Weights
brush, because the standard brush display cannot be disabled while another tool is active.
Paint Position Precision
When painting on a currently deformed mesh, smoothing weights affects the position of the vertices. The deformed position is stored at the beginning of the stroke and used for its duration. If the position of a vertex changes too much over the course of the stroke, the precision of the brush is gradually reduced. To improve precision again, end the stroke and start a new one, which triggers re-evaluation of the deformed points. This is a known limitation, because Blender needs to evaluate the deformed mesh to get the current point positions, which reduces performance during the current brush stroke.
Brush Undo
Undoing a stroke while
Smooth Weights
is active can be slow depending on the number of affected vertices. It is recommended to only undo smaller groups of vertices. If broader changes need to be undone, it is usually best to cancel the tool, which resets the mesh to the state before the tool was entered.
Orthographic Views
The tool works best in perspective views. Orthographic views are supported but may not be as precise.
12. Customisability
Smooth Weights offers a wide range of customisable options, available in the add-on preferences. These include preferred keymaps for favourite properties, colours, and an individual layout for the pie menu.
Because the level of customisation can be quite high, the current configuration can be saved in case a fresh installation of Blender is required. The current setup is stored in a file named config.json in the add-on folder. Save this file to a backup location and copy it back once the new installation is running.
Disclaimer
This documentation reflects the current state of Smooth Weights for Blender. Functionality and features may evolve in future releases.
Copyright (C) 2023-2026, Ingo Clemens, brave rabbit,
www.braverabbit.com
GNU GENERAL PUBLIC LICENSE Version 3